GPhO 2016, Експеримент — Задача 2. Tungsten filament
The 1st Gulf Physics Olympiad — Experimental Competition · 22 март 2016 г. · 13 т.
Указания
- The examination lasts for 5 hours. There are 2 problems worth in total 20 points.
- Initially the experimental equipment on table is covered. You must neither remove the cover nor open the envelope with the problems before the sound signal of the beginning of competition.
- You are not allowed to leave your working place without permission. If you need any assistance (malfunctioning equipment, broken calculator, need to visit a restroom, etc), please raise and keep your hand raised until an organizer arrives.
- Use only the front side of the sheets of paper.
- For each problem, there are dedicated Solution Sheets (see header for the number and pictogramme). Write your solutions onto the appropriate Solution Sheets. For each Problem, the Solution Sheets are numbered; use the sheets according to the enumeration. Always mark which Problem Part and Question you are dealing with. Copy the final answers into the appropriate boxes of the Answer Sheets. There are also Draft papers; use these for writing things which you don’t want to be graded. If you have written something that you don’t want to be graded onto the Solution Sheets (such as initial and incorrect solutions), cross these out.
- If you need more paper for a certain problem, please raise your hand and tell an organizer the problem number; you are given two Solution sheets (you can do this more than once).
- You need to estimate uncertainties only in those cases where you are specifically asked to do so.
- You should use as little text as possible: try to explain your solution mainly with equations, numbers, symbols and diagrams. Though in some places textual explanation may be unavoidable.
- Do not look into the laser beam or its reflections! It may permanently damage your eyes.
- After the signal signifying the end of examination you must stop writing immediately. Put all the papers into the envelope at your desk. You are not allowed to take any sheet of paper out of the room. If you have finished solving before the final sound signal, please raise your hand.
Условие
WARNINGS:
- Do not look into the laser beam or its reflections!
- Do not connect the electrolytic capacitor in a circuit that can result in reverse polarity on the capacitor! The grey ribbon on it denotes the “minus” side.
- Do not short the electrolytic capacitor with the multimeter (in ammeter mode or with the “10 A” connector)!
- Use safety goggles while using the electrolytic capacitor (connecting capacitor in reverse polarity may result in an outburst of hot electrolyte)!
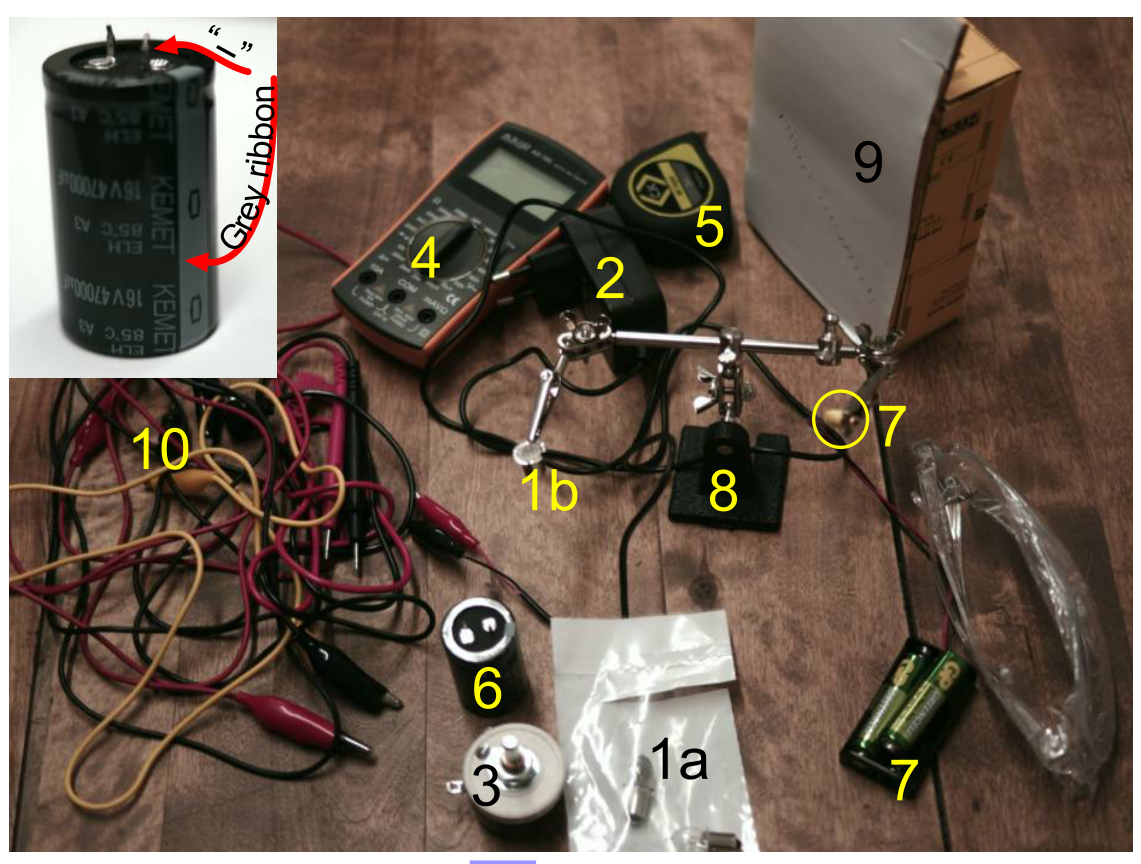
The setup comprises of 1a three incandescent bulbs with a tungsten filament which you can consider identical for the purposes of the experiment, 1b one broken bulb without glass, its broken filament is exposed to air (if you need few more bulbs, ask an organizer), 2 power adapter, 3 rheostat, 4 multimeter, 5 measuring tape, 6 electrolytic capacitor, 7 laser with a 3 V battery pack attached, 8 stand, 9 screen (multimeter box with a white paper attached), 10 leads (2 tester leads, 3 banana plug – crocodile clamp leads, 2 crocodile clamp – crocodile clamp leads)
Numerical values for your calculations: Wavelength of the laser . Density of tungsten
Specific resistance of tungsten at room temperature . Function that approximates the temperature of tungsten as a function of its specific resistance fairly well for temperatures between and tungsten’s melting temperature :
Stefan-Boltzmann constant . Capacitance of the electrolytic capacitor . Multimeter’s uncertainty: as ohmmeter 0.8% + 5 times the last significant digit (LSD), as ammeter (10A) 2% + 5× LSD, as voltmeter 0.5% + 4× LSD.
Part A. Filament’s diameter Measure the diameter of the tungsten filament using diffraction. Use the incandescent bulb with exposed filament (the filament has been straightened from its regular coil shape). Sketch the measurement setup. Hint: the diffraction pattern from a wire is the same as from a single slit of equal diameter. In order to increase the intensity of the diffraction pattern on screen, focus the laser beam onto the filament by twisting the cap of the laser housing (the laser spot on the screen will be defocused).
If you were unable to determine the diameter, use in what follows (which might not be the correct value). [1,5 т.]
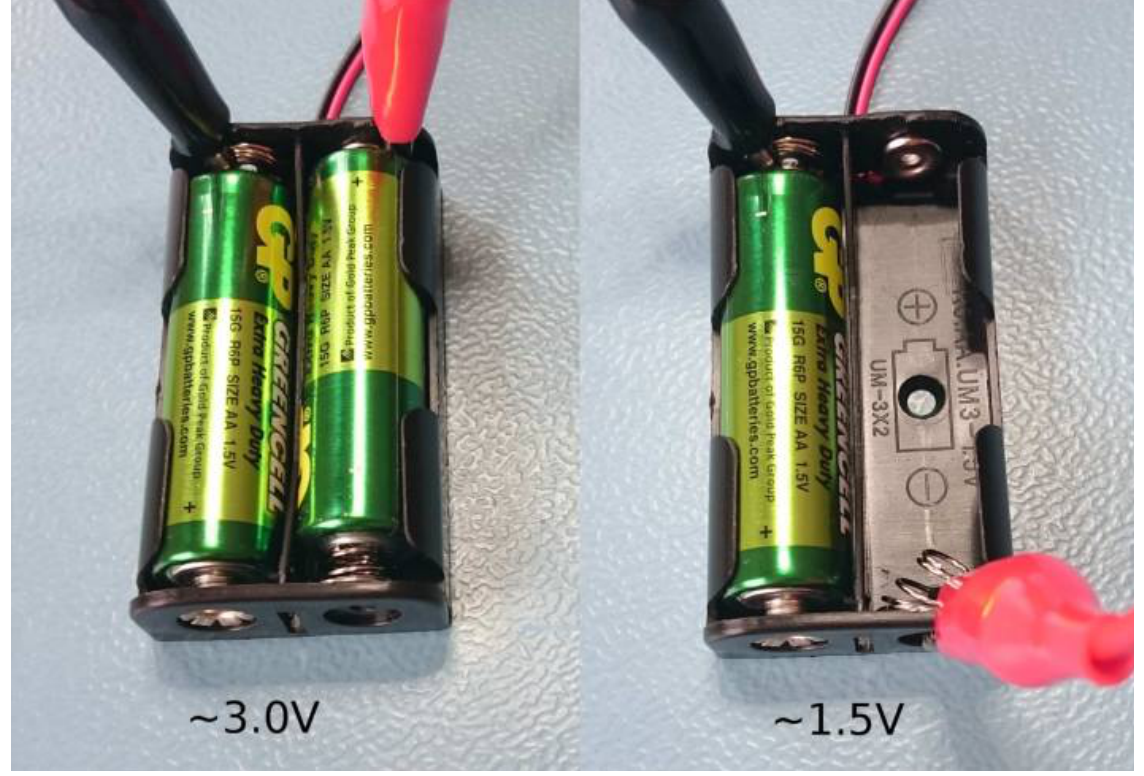
Part B. Filament’s resistance Measure the resistance of the filament at the room temperature as accurately as possible. Document the circuit used. Calculate the filament’s length . Estimate the uncertainty. You can neglect the resistance of the bulb housing and of the wires supporting the filament. When the multimeter is used for voltage measurements, it can be considered as an ideal voltmeter. When used as an ammeter, its internal resistance cannot be neglected. Note that you can use the power supply which provides , but if necessary, you can also use the laser battery holder as a supply or as a supply as shown in the image (while you use it as a supply, the laser will operate). [2 т.]
Part C. Current–voltage curve Plot the current through the bulb as a function of voltage from until the filament breaks. Document your circuit. What was the maximum temperature of the filament when it broke?
Note that you can use multimeter in -range for current measurements; if you do so, you do not have to rebuild the circuit for measuring the voltage: when the multimeter’s selector knob is turned between and voltage measurement positions, the ”10A” and COM terminals remain connected inside the multimeter through a resistor of few ohms, and the resistance between the COM and multi-purpose terminals remains very large. [2,5 т.]
Part D. Emissivity Assuming that (a) all of the heat from the filament is dissipated with thermal radiation, and (b) the tungsten filament is a grey body, i.e. its emissivity does not depend on temperature , the Stefan-Boltzmann law predicts that the power dissipation , where is the surface area of the filament and is the emissivity. Build a graph to verify this prediction. Indicate, for which range of temperatures this prediction holds, and find emissivity of the tungsten filament for that range. At which temperatures the prediction does not hold? Why the prediction fails for these temperatures? [3,5 т.]
Part E. Specific heat capacity of tungsten Measure the quantity of heat required to raise the temperature of the filament from the room temperature to its breaking temperature, and calculate average specific heat of tungsten over this range of temperatures. Document the circuit used. Estimate the magnitude of the main source of error. Hint: if you need a voltage higher than , you can use the power supply and battery pack in series to achieve voltages up to ca . [3,5 т.]
Отговори
Part A. Filament’s diameter 46.3 µm
Part B. Filament’s resistance R = 0.77 Ω ± 0.03 Ω; l = 23 mm ± 2 mm
Part C. Current–voltage curve 3190 K
Credit is given for results between 3000 K and 3700 K.
Part D. Emissivity k ≈ 0.4 (constant for 1350 K < T < 3000 K); the prediction fails for T < 1350 K, where heat transfer by convection and conduction cannot be neglected.
Part E. Specific heat capacity of tungsten 187 J/(K·kg)
Q = 0.5 J; results from 100 to 300 J/(K kg) are accepted; the main error is the heat radiated before the filament breaks, Qr ≈ 0.15 J.
Решение
Problem E2. Tungsten Filament (13 points)
Part A. Filament diameter (1.5 points)
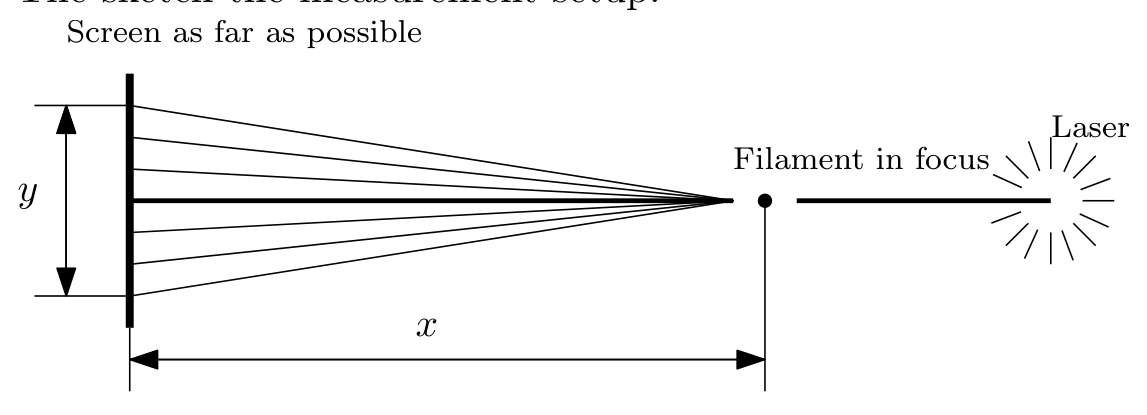
The sketch the measurement setup:
(0.2 pts)
We focus the laser to the filament, holding the screen close to the filament during the adjustments helps focusing. For the measurements we place the screen perpendicular to the beam and reasonably far back () to get the maxima spaced out. (0.2 pts)
Partial credit if . (0.1 pts)
We measure the distance between two maxima or two minima. To get more accurate measurement we choose maxima that are far apart (). (0.2 pts)
Partial credit if . (0.1 pts)
Formula for calculating diameter . (0.2 pts)
Most of the uncertainty in this case is due to the fact the diffraction pattern is fuzzy. To estimate the uncertainty we should perform repeated measurements (three or more).
| 10 | 909 mm | 131 mm | 45.1 µm |
| 7 | 905 mm | 89 mm | 46.3 µm |
| 7 | 907 mm | 87 mm | 47.4 µm |
(0.3 pts)
(Each line in table up to 3rd earns 0.1 pts.)
Filament diameter and its uncertainty:
For , (0.2 pts)
partial credit if , (0.1 pts)
Uncertainty is dominated by the uncertainty of , . Reasonably estimated , (0.1 pts)
correct calculation of (0.1 pts)
Part B. Filament’s resistance (2 points)
The problem is that with this multimeter we cannot accurately measure the resistance of the filament directly when the knob is turned to the resistance measurement position, the resistance is too small for that. There are two issues: first, the multimeter is not accurate enough ; second, the internal resistance can be in the same order of magnitude. If the filament’s resistance is directly measured, no more than 0.5 points overall: 0.3 pts for the answer if it is within , and 0.2 pts for the uncertainty if it is stated as either or .
Thus, we need to pass a current through the bulb and measure the voltage. (0.1 pts)
The current needs to be small, otherwise we shall heat the filament. (0.2 pts)
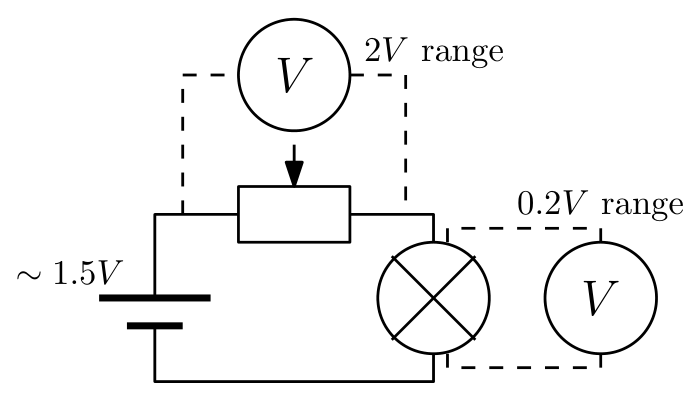
To get the smallest possible current we use a single battery (0.1 pts)
in series with the rheostat. (0.1 pts)
We can measure accurately the voltage on the bulb, but the problem is the current, because the ammeter is not ideal. If we use it in the “mA”-range, we cannot take account its internal resistance, if we use it in 10A-range, the current measurement error will be large. So, we need to use the multimeter as a voltmeter. (0.1 pts)
Thus, we use the circuit as shown below. (0.1 pts)
The resistance of the rheostat can be measured directly, or using current/voltage measurements, (0.1 pts)
(0.1 pts)
Here and in what follows only reasonable results are accepted.
Measurement results: (0.1 pts)
(0.1 pts)
, and (0.1 pts)
Formula for filament resistance (0.1 pts)
Formula for filament resistance uncertainty
(0.1 pts)
Formula for filament length (0.1 pts)
Formula for filament length uncertainty
(0.1 pts)
Filament resistance and its uncertainty:
(0.1 pts)
(0.1 pts)
Filament length and its uncertainty:
(0.1 pts)
(0.1 pts)
Part C. Current–voltage curve (2.5 points)
Now we connect the bulb to the battery via rheostat as a potentiometer, i.e. according to the diagram below. Only that way will we be able to cover the whole range of voltages from to . (0.2 pts)
If we connect the rheostat in series, we’ll miss low voltage values (unless we switch the power supply to a battery).
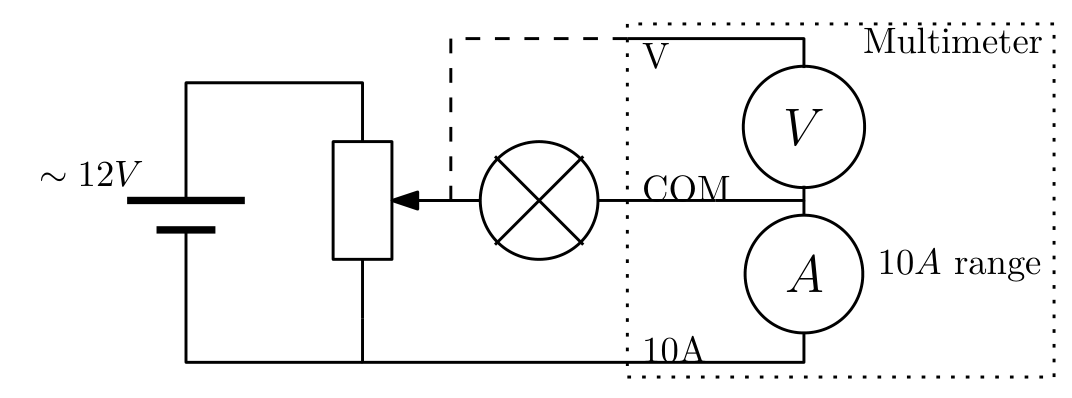
Usable correctly drawn circuit (even if the rheostat is connected in series) deserves credit. (0.2 pts)
If we leave ammeter connected during voltage measurements, the COM terminal must be connected to the bulb, because voltage drop on the ammeter is not negligible. Credit is given for any circuit which does not neglect the internal resistance of the ammeter. (0.3 pts)
| 100 mV | 100 mA | 1000 mV | 230 mA | 5500 mV | 540 mA |
| 200 mV | 140 mA | 1500 mV | 280 mA | 6000 mV | 560 mA |
| 300 mV | 150 mA | 2000 mV | 320 mA | 6500 mV | 590 mA |
| 400 mV | 150 mA | 2500 mV | 360 mA | 7000 mV | 610 mA |
| 500 mV | 170 mA | 3000 mV | 390 mA | 7500 mV | 630 mA |
| 600 mV | 180 mA | 3500 mV | 430 mA | 8000 mV | 620 mA |
| 700 mV | 200 mA | 4000 mV | 460 mA | 8300 mV | 600 mA |
| 800 mV | 200 mA | 4500 mV | 490 mA | ||
| 900 mV | 220 mA | 5000 mV | 510 mA |
At least 4 correct measurements below . (0.2 pts)
Partial credit if 3 measurements (0.1 pts)
Partial credit if 2 measurements (0.05 pts)
(Final score for this task is rounded up to a single decimal digit.)
At least 4 correct measurements for (0.2 pts)
Partial credit if 3 measurements (0.1 pts)
Partial credit if 2 measurements (0.05 pts)
At least 4 correct measurements for (0.2 pts)
Partial credit if 3 measurements (0.1 pts)
Partial credit if 2 measurements (0.05 pts)
At least 4 correct measurements above (0.2 pts)
Partial credit if 3 measurements (0.1 pts)
Partial credit if 2 measurements (0.05 pts)
Formula for filament temperature expressed in terms of the current and voltage at which the tungsten filament broke:
(0.2 pts)
Correctly calculated temperature (0.1 pts)
Credit is given if the result remains between to .
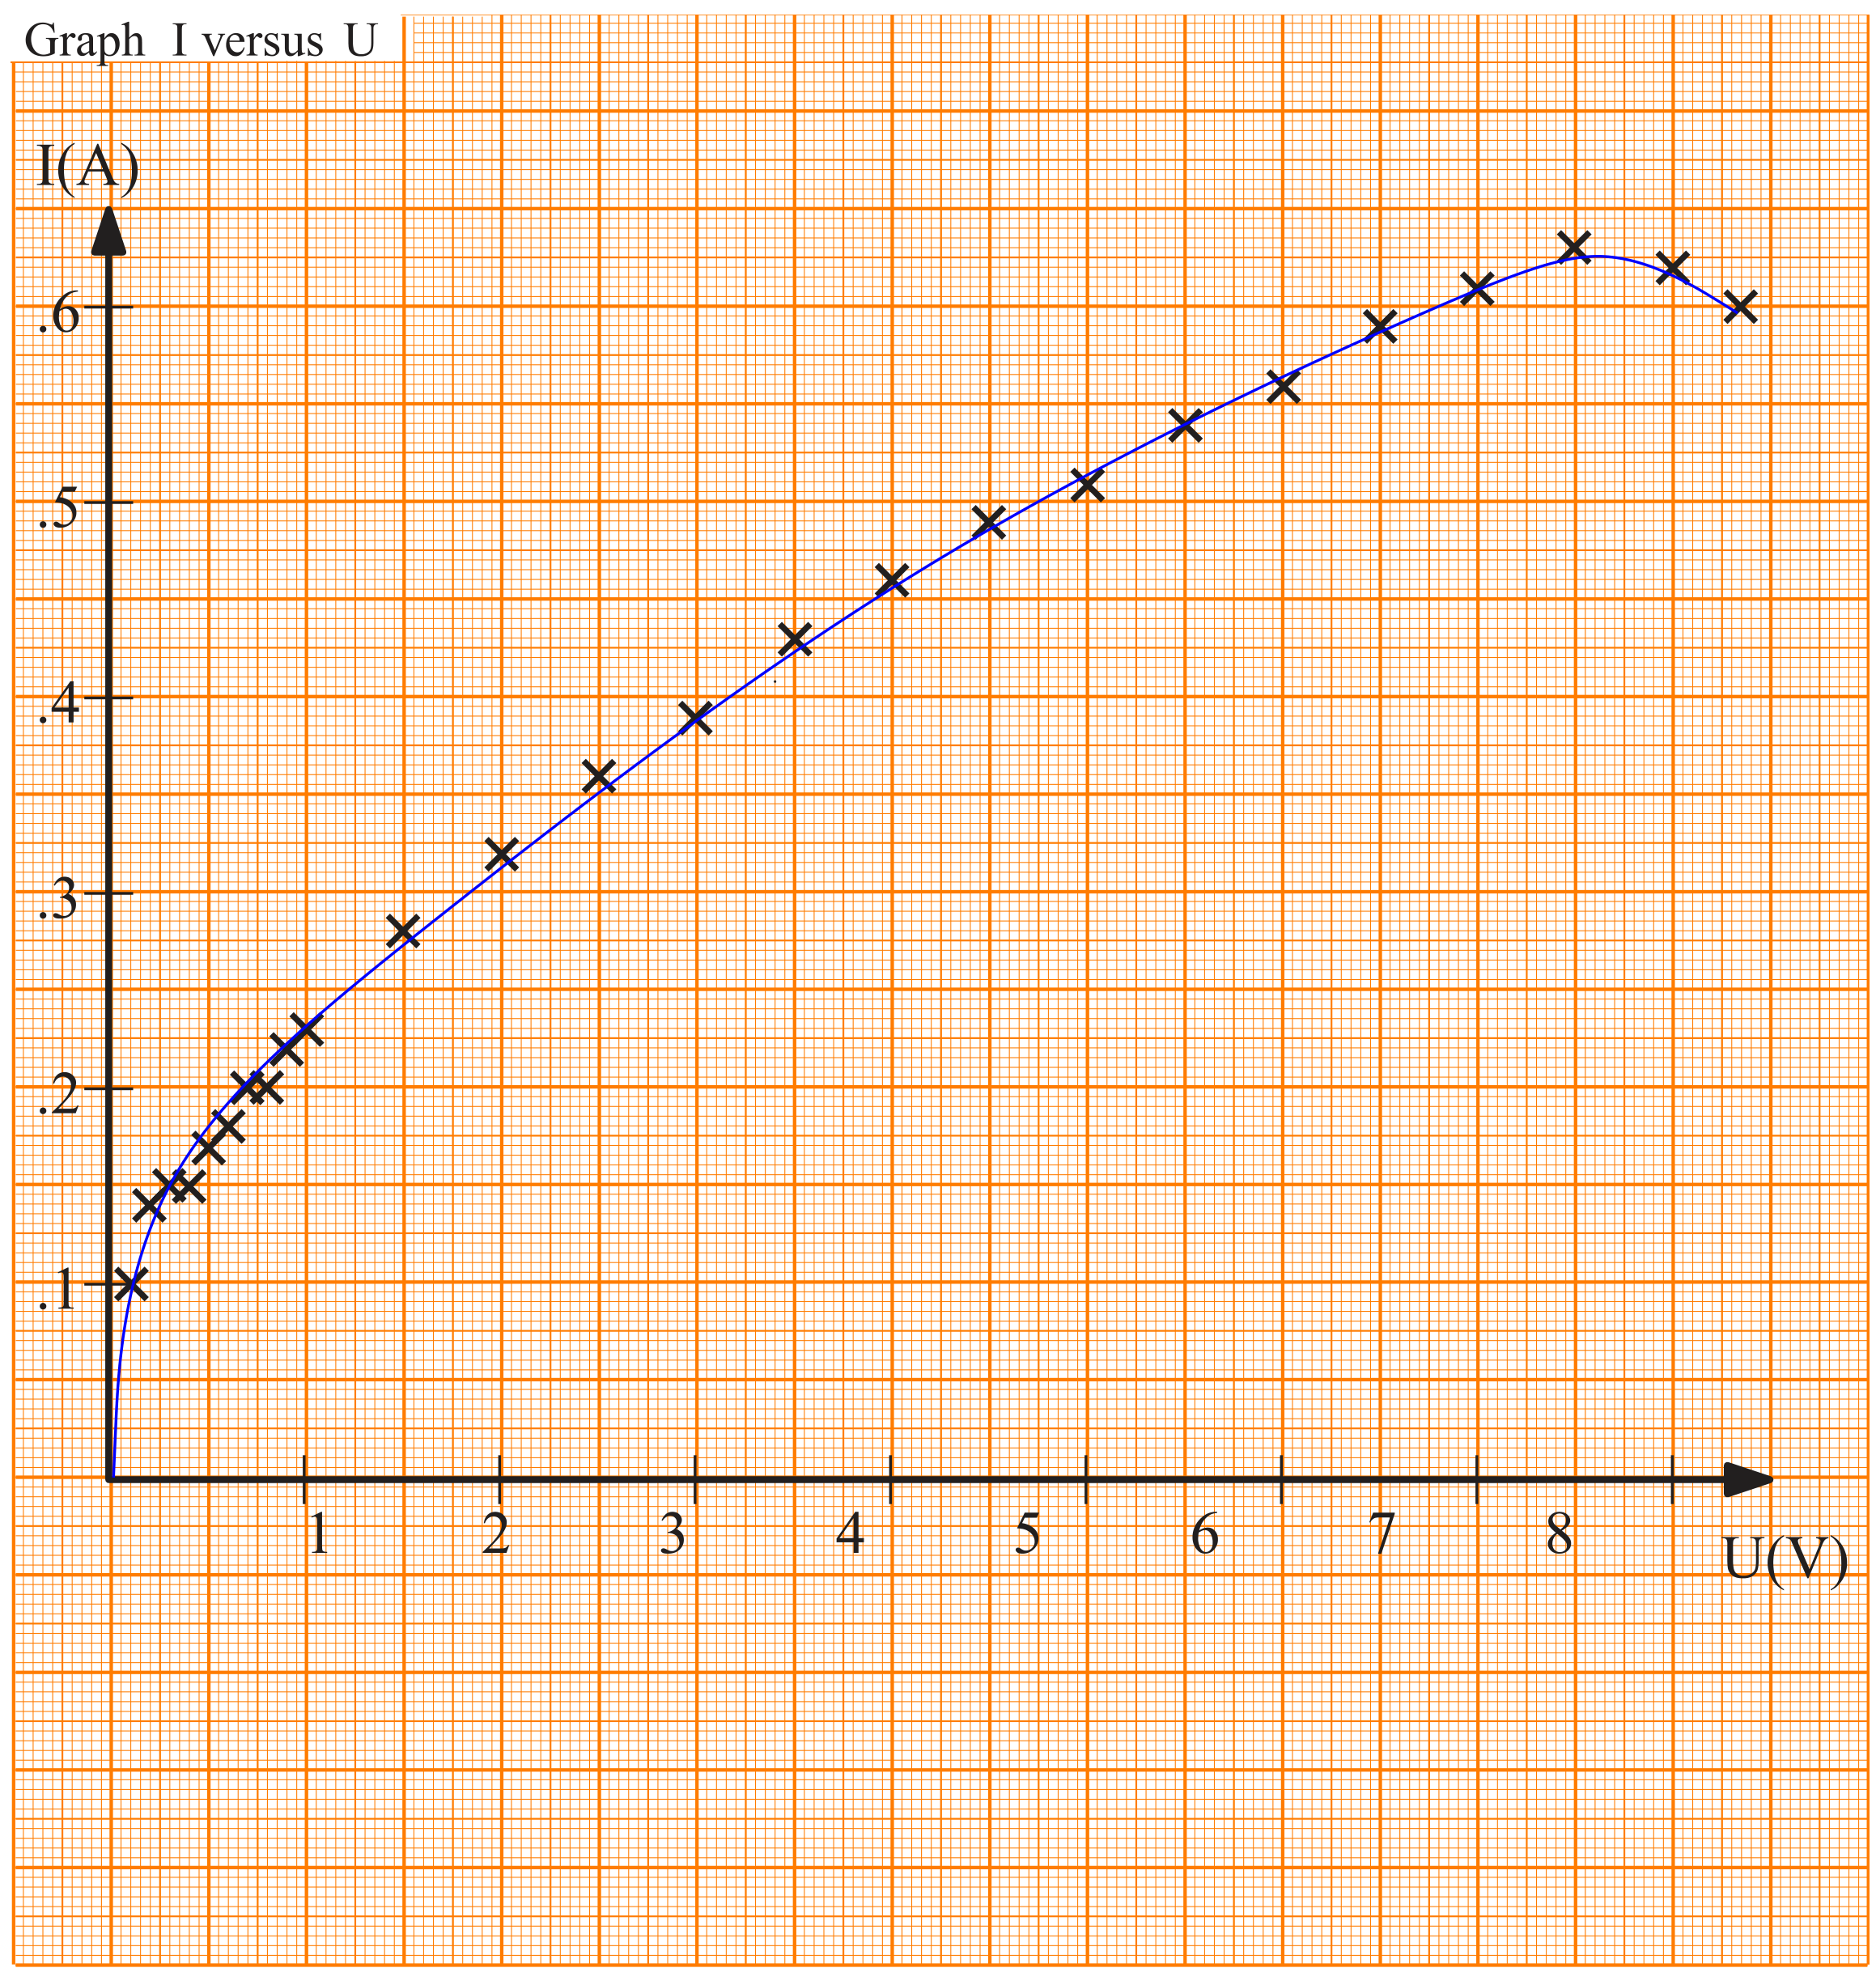
Graph is given at Pg. 7. Grading of the graph: axes marked with scales and units, and labelled correctly. (0.1 pts)
Scale is chosen appropriately (graph covers at least one third of the graphical paper area). (0.1 pts)
Data correctly carried over to the graph. (0.3 pts)
Partial credit: one clear mistake: 0.2 points, two clear mistakes: 0.1 points; if some points from the table are not copied, as long as there are 4 data points in each of the four ranges given above, no penalty. If this condition is not satisfied, subtract 0.1 points for each point which was not copied until no marks remains for the graph.
Curve connecting the points is drawn. (0.1 pts)
The drawn curve goes through origin. (0.1 pts)
Part D. Emissivity (3.5 points)
To verify the prediction we should build a plot of versus which should be constant. We could alternatively plot versus which would be linear or we could also plot versus in logarithmic scale and measure the slope, these are the correct options (but second and third options make the follow-up questions somewhat harder to answer). (0.5 pts)
We can calculate temperature from (0.2 pts)
We can calculate emissivity from (0.3 pts)
Calculated data (you don’t have to fill the entire table):
| 380 K | 2.52 | 1245 K | 0.50 | 2531 K | 0.38 |
| 496 K | 2.43 | 1488 K | 0.45 | 2633 K | 0.37 |
| 648 K | 1.34 | 1695 K | 0.41 | 2691 K | 0.39 |
| 823 K | 0.69 | 1852 K | 0.40 | 2777 K | 0.38 |
| 893 K | 0.70 | 2016 K | 0.37 | 2855 K | 0.37 |
| 993 K | 0.59 | 2112 K | 0.40 | 3033 K | 0.31 |
| 1035 K | 0.64 | 2230 K | 0.39 | 3191 K | 0.25 |
| 1160 K | 0.47 | 2330 K | 0.39 | ||
| 1182 K | 0.53 | 2455 K | 0.37 |
The full credit (0.6 pts) for the table breaks down as follows:
At least 4 correct data points below . (0.2 pts)
Partial credit if 3 data points (0.1 pts)
Partial credit if 2 data points (0.05 pts)
(Final score for this task is rounded up to a single decimal digit.)
At least 4 correctly calculated data points between and (0.2 pts)
Partial credit if 3 data points (0.1 pts)
Partial credit if 2 data points (0.05 pts)
At least 4 correct data points above (0.2 pts)
Partial credit if 3 data points (0.1 pts)
Partial credit if 2 data points (0.05 pts)
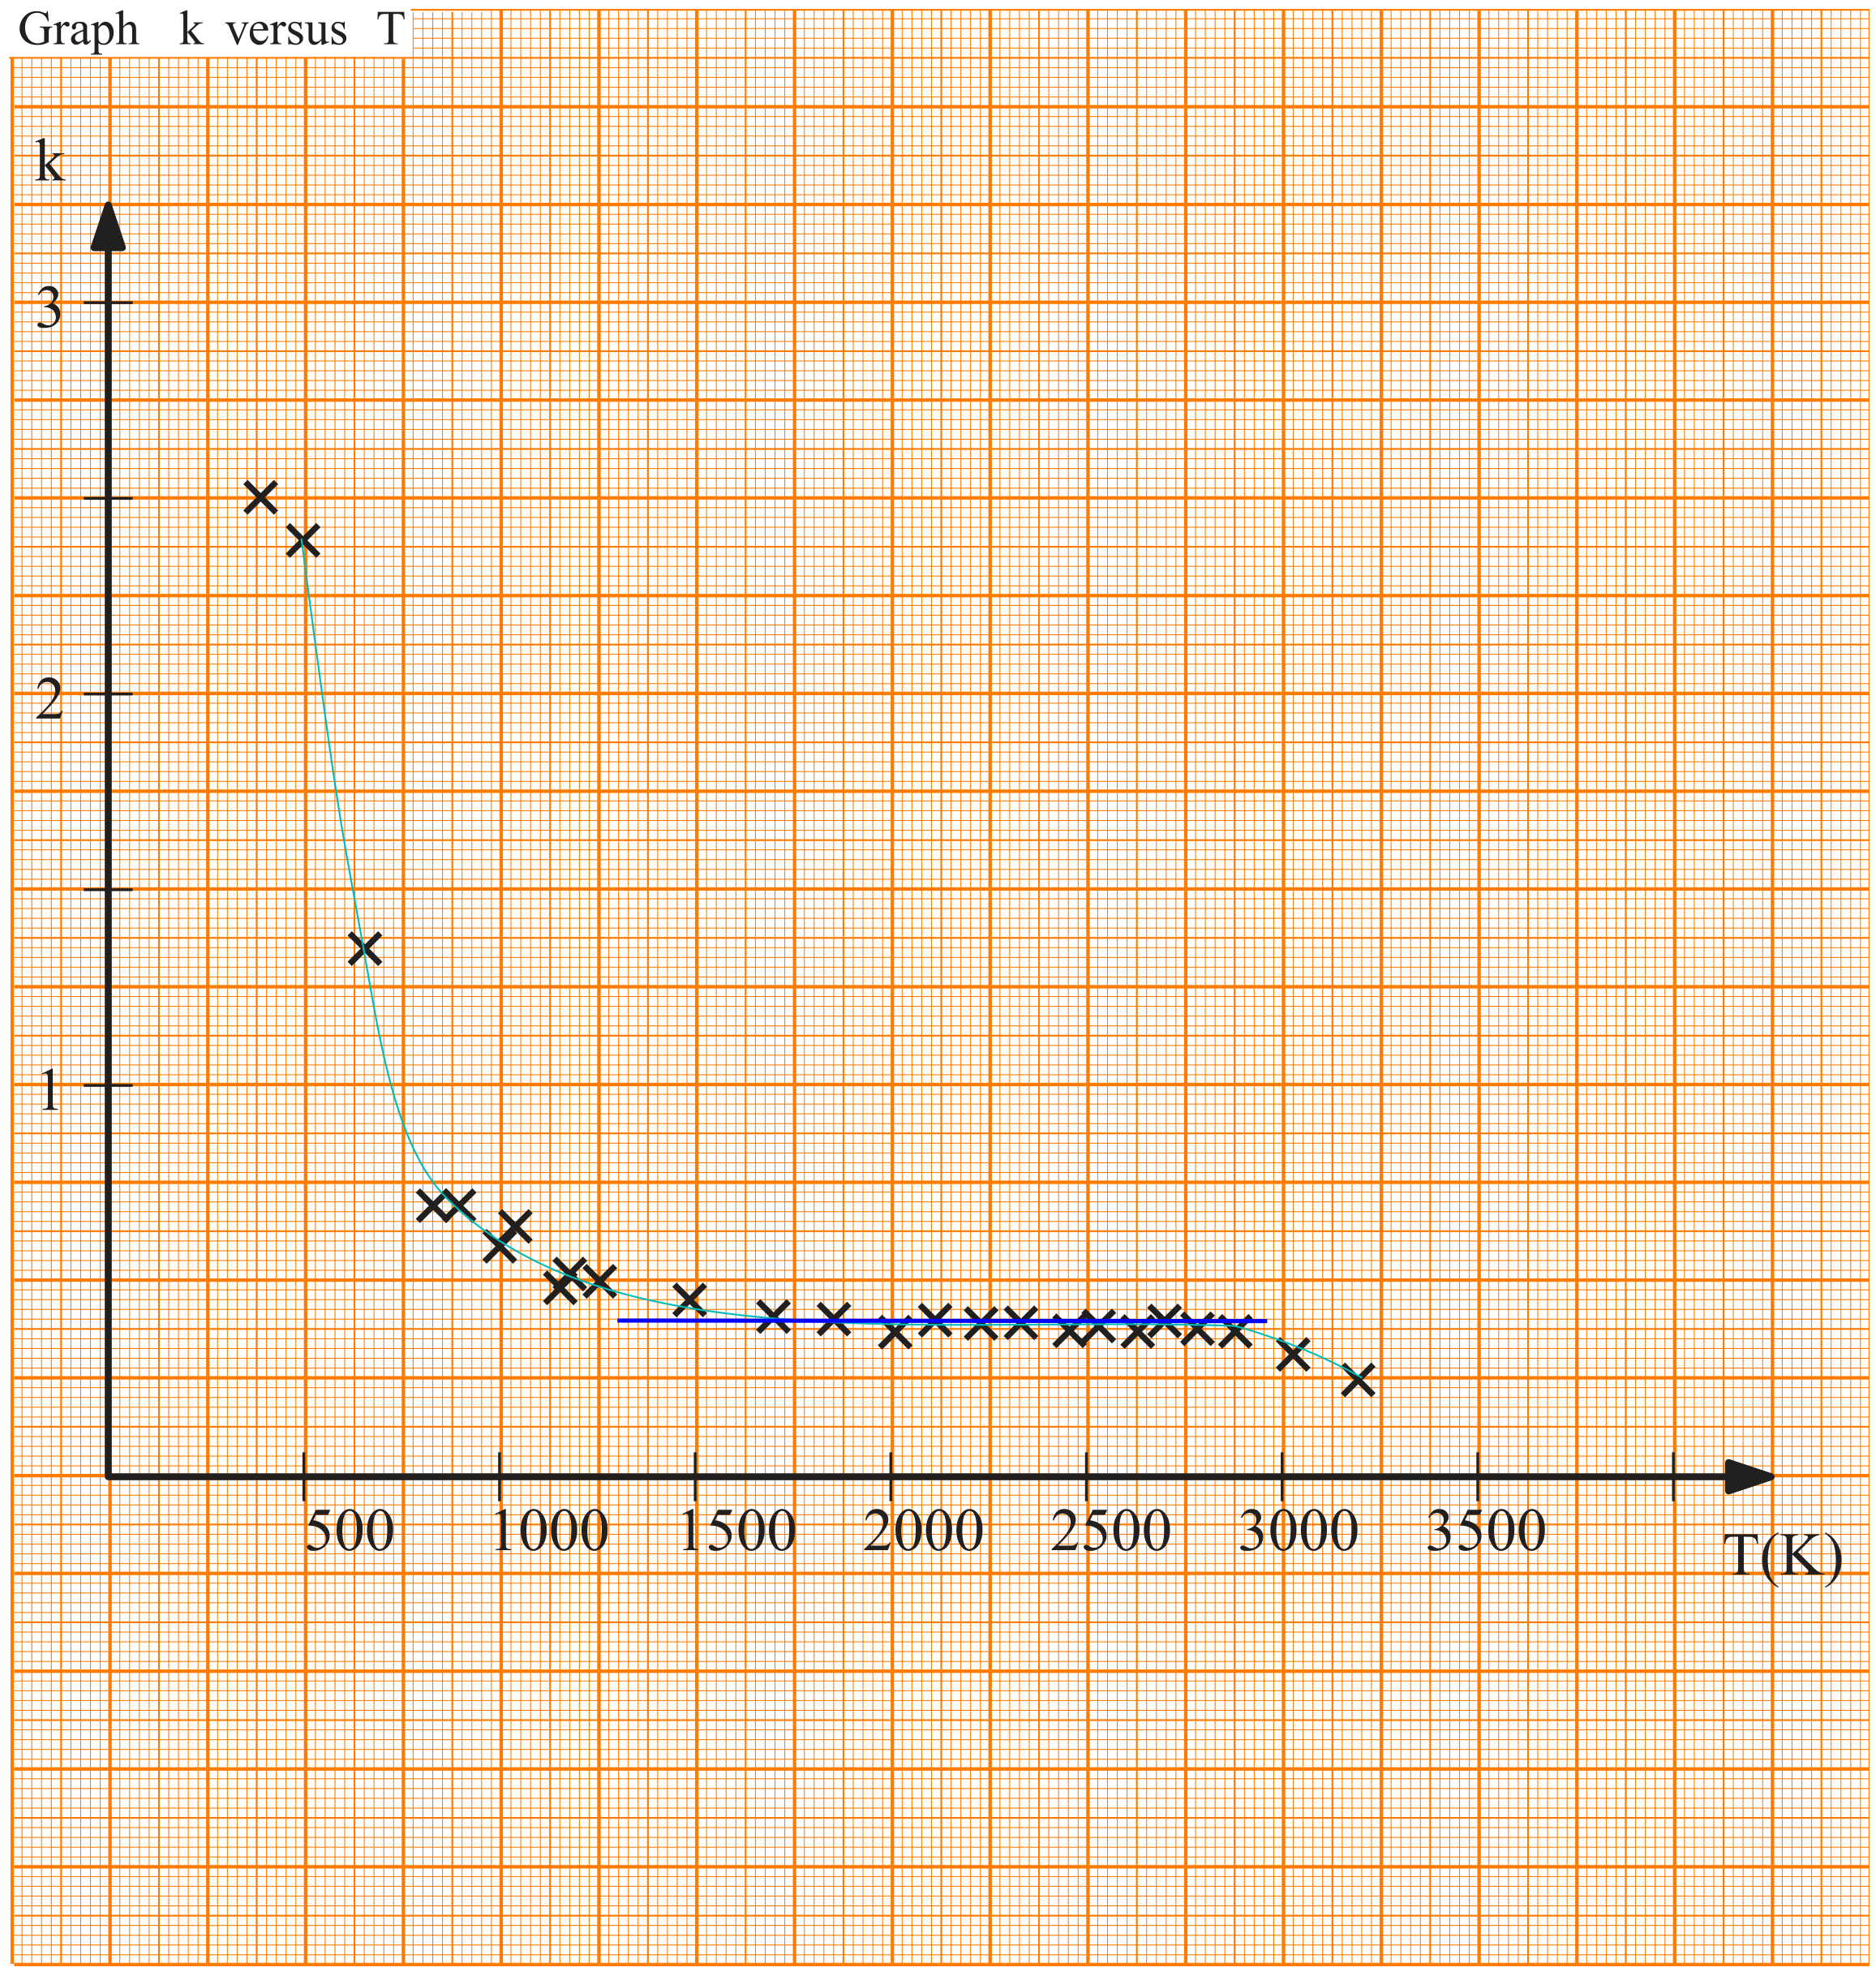
Graph is given at Pg. 8. Grading of the graph: axes marked with scales and units, and labelled correctly. (0.1 pts)
Scale is chosen appropriately (graph covers at least one third of the graphical paper area). (0.1 pts)
Data correctly carried over to the graph. (0.3 pts)
Partial credit: one clear mistake: 0.2 points, two clear mistakes: 0.1 points; if some points from the table are not copied, as long as there are 4 data points in each of the four ranges given above, no penalty. If this condition is not satisfied, subtract 0.1 points for each point which was not copied until no marks remains for the graph.
Curve connecting the points is drawn. (0.1 pts)
Range of constant is shown. (0.1 pts)
At small temperatures, is larger. (0.1 pts)
We can see that the emissivity in more or less constant in the middle of the graph The lower limit of this range is (0.2 pts)
Partial credit for results within the extended range of . (0.1 pts)
The upper limit is either the breaking temperature, or a value larger than . (0.1 pts)
The emissivity in that range Answers in the range 0.3 to 0.5 give full credit. (0.3 pts)
Partial credit for results from 0.25 to 0.55 (0.2 pts)
and from 0.2 to 0.65. (0.1 pts)
From the plot we can see that prediction fails when (the value stated above). Based on the graph on Pg. 8, one can say that it fails also at very high temperatures when , but this is not always so and depends on how fast the measurements are taken. In this case the measurements were taken quite slowly and the resistance of the filament grew at the very end because tungsten deposited itself to the inside of the glass.
We can see that in the low temperatures it appears as if that . That is because in these lower temperatures our assumption that heat is transferred mainly by radiation fails and we can’t neglect heat transfer by convection and conduction. (0.5 pts)
Part E. Specific heat capacity of tungsten (3.5 points)
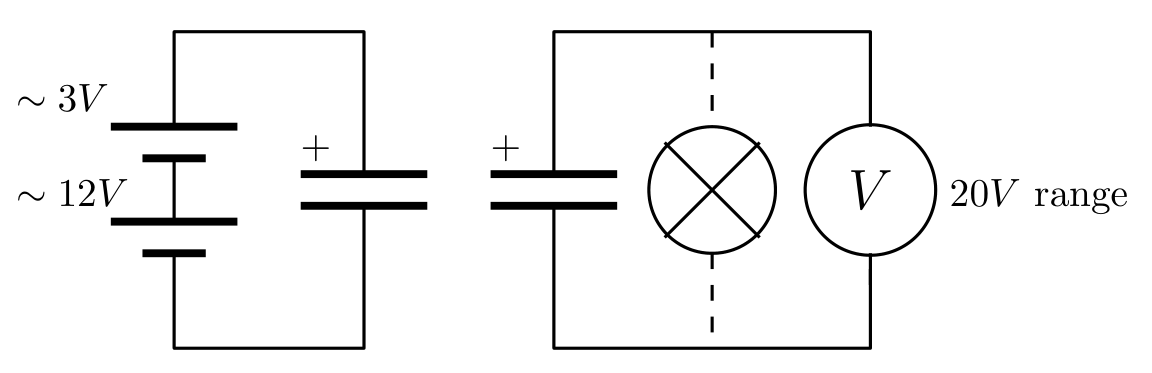
We can measure how much energy it took to break the filament by connecting the bulb to the capacitor charged to a high voltage. By measuring the voltage on the capacitor before and after the process we can calculate the energy. (0.5 pts)
To get better accuracy we must make the radiated power as low as possible, that means we have to break the filament as fast as possible, that means we must charge the capacitor to highest possible voltage. For using the highest possible voltage of . (0.3 pts)
(0.2 pts)
Formula for quantity of heat (0.1 pts)
(0.1 pts)
(0.1 pts)
Quantity of heat (0.3 pts)
We cannot perform (many) repeated measurements because we have only few bulbs.
For average specific heat , measured quantities and calculations:
We use the breaking temperature from previous part.
(0.3 pts)
(0.2 pts)
Results from to are accepted, results within the extended range, from to give a partial credit. (0.1 pts)
We know the amount of energy that was taken from the capacitor fairly accurately. (0.2 pts)
Indeed, the magnitude of relative uncertainty that is caused by filament dimensions is about 15% and the magnitude of relative uncertainty that is caused from the measurement of breaking temperature is around 10%.
The largest source of error is from the amount of heat radiated away before the filament breaks. (0.5 pts)
We can estimate its value as follows. When we connect the bulb to the capacitor, the initial current is the largest, but it drops very fast as the filament heats up and its resistance grows. That means most of the time is spent so that the filament is hot and has high resistance. Because the voltage drop on the capacitor was small we can estimate discharge time from
(0.3 pts)
Any reasonable estimation slightly departing from what is given above gives full credit. Power radiated away during that time is estimated as . (0.3 pts)
which numerically gives (0.1 pts)
which is 30% of final result.
Оригинал в Архива: exp.pdf · официални решения: exp_sol.pdf